mdl
Quick start: DELF extraction and matching
Install DELF library
To be able to use this code, please follow these instructions to properly install the DELF library.
Download Oxford buildings dataset
To illustrate DELF usage, please download the Oxford buildings dataset. To
follow these instructions closely, please download the dataset to the
tensorflow/models/research/delf/delf/python/examples directory, as in the
following commands:
# From tensorflow/models/research/delf/delf/python/examples/
mkdir data && cd data
wget http://www.robots.ox.ac.uk/~vgg/data/oxbuildings/oxbuild_images.tgz
mkdir oxford5k_images oxford5k_features
tar -xvzf oxbuild_images.tgz -C oxford5k_images/
cd ../
echo data/oxford5k_images/hertford_000056.jpg >> list_images.txt
echo data/oxford5k_images/oxford_000317.jpg >> list_images.txt
Download pre-trained DELF model
Also, you will need to download the trained DELF model:
# From tensorflow/models/research/delf/delf/python/examples/
mkdir parameters && cd parameters
wget http://storage.googleapis.com/delf/delf_gld_20190411.tar.gz
tar -xvzf delf_gld_20190411.tar.gz
DELF feature extraction
Now that you have everything in place, running this command should extract DELF
features for the images hertford_000056.jpg and oxford_000317.jpg:
# From tensorflow/models/research/delf/delf/python/examples/
python3 extract_features.py \
  --config_path delf_config_example.pbtxt \
  --list_images_path list_images.txt \
  --output_dir data/oxford5k_features
Image matching using DELF features
After feature extraction, run this command to perform feature matching between
the images hertford_000056.jpg and oxford_000317.jpg:
python3 match_images.py \
  --image_1_path data/oxford5k_images/hertford_000056.jpg \
  --image_2_path data/oxford5k_images/oxford_000317.jpg \
  --features_1_path data/oxford5k_features/hertford_000056.delf \
  --features_2_path data/oxford5k_features/oxford_000317.delf \
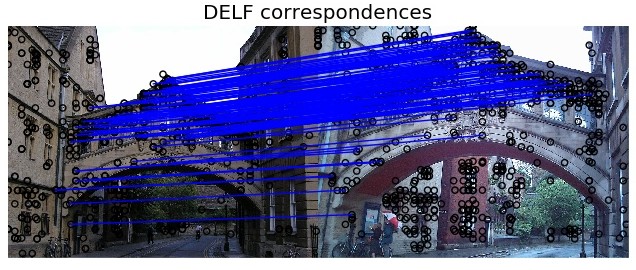
  --output_image matched_images.png
The image matched_images.png is generated and should look similar to this one:

Troubleshooting
matplotlib
matplotlib may complain with a message such as no display name and no
$DISPLAY environment variable. To fix this, one option is add the line
backend : Agg to the file .config/matplotlib/matplotlibrc. On this problem,
see the discussion
here.
‘skimage’
By default, skimage 0.13.XX or 0.14.1 is installed if you followed the
instructions. According to
[https://github.com/scikit-image/scikit-image/issues/3649#issuecomment-455273659]
If you have scikit-image related issues, upgrading to a version above 0.14.1
with pip3 install -U scikit-image should fix the issue
